Modul #05 Belajar Pemrograman Framework Laravel Tahap Dasar: Laravel Database Tahap Dasar
- Purnama Anaking
- Technology
- December 5, 2023
Note
Artikel ini merupakan bagian dari:
Pada modul kali ini kita akan melanjutkan belajar tentang laravel database. Materi tentang laravel database akan diilustrasikan dalam bentuk studi kasus sederhana secara bertahap. Kegiatan ini agar kita dapat memahami dan menerapkan manajemen database pada laravel framework.
1. Aktifkan Service MySQL dan PhpMyAdmin
Buka XAMPP Control Panel
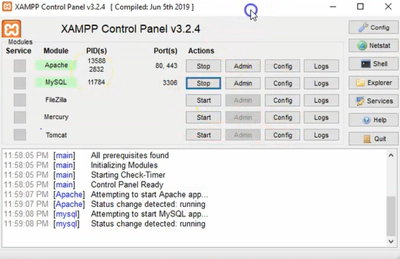
Start service Apache
Start service MySQL
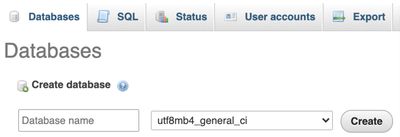
Buka PhpMyAdmin via browser
Buat database baru dengan nama “data_master” melalui PhpMyAdmin.
2. Setup Database Config
Buka file .env pada project laravel kalian.
Set variabel DB_DATABASE dengan nilai “data_master” (sesuai dengan nama database yang dibuat melalui PhpMyAdmin)
DB_DATABASE=data_master
3. Skema Database
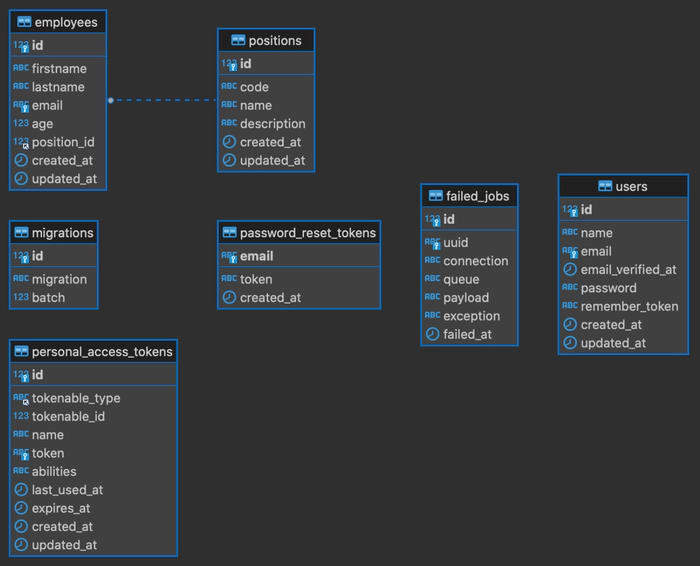
Kita akan membuat skema database sederhana seperti di bawah ini. Terdapat 2 Tabel yaitu employees dan positions. Memiliki hubungan one-to-many, dimana pada tabel employees terdapat kolom position_id yang merujuk pada kolom id pada tabel positions.
4. Membuat Skema Database Menggunakan Migration
Generate file migration untuk tabel positions via Artisan
php artisan make:migration create_positions_tableBuat kode program pada file migration yang telah dibuat yang mendefinisikan tabel positions seperti di bawah ini.
<?php

use Illuminate\Database\Migrations\Migration;
use Illuminate\Database\Schema\Blueprint;
use Illuminate\Support\Facades\Schema;

return new class extends Migration
{
    /**
     * Run the migrations.
     */
    public function up(): void
    {
        Schema::create('positions', function (Blueprint $table) {
            $table->id();
            $table->string('code');
            $table->string('name');
            $table->string('description');
            $table->timestamps();
        });
    }

    /**
     * Reverse the migrations.
     */
    public function down(): void
    {
        Schema::dropIfExists('positions');
    }
};
Generate file migration untuk tabel employees via Artisan
php artisan make:migration create_employees_tableBuat kode program pada file migration yang telah dibuat yang mendefinisikan tabel employees seperti di bawah ini.
<?php

use Illuminate\Database\Migrations\Migration;
use Illuminate\Database\Schema\Blueprint;
use Illuminate\Support\Facades\Schema;

return new class extends Migration
{
    /**
     * Run the migrations.
     */
    public function up(): void
    {
        Schema::create('employees', function (Blueprint $table) {
            $table->id();
            $table->string('firstname');
            $table->string('lastname')->nullable();
            $table->string('email')->unique();
            $table->integer('age');
            $table->foreignId('position_id')->constrained();
            $table->timestamps();
        });
    }

    /**
     * Reverse the migrations.
     */
    public function down(): void
    {
        Schema::dropIfExists('employees');
    }
};
Eksekusi file migration yang telah dibuat via Artisan
php artisan migrate
5. Membuat Data Dummy Menggunakan Seeder
Generate file seeder untuk tabel positions via Artisan
php artisan make:seeder PositionSeederBuat kode program pada file seeder yang telah dibuat untuk tabel positions seperti di bawah ini.
<?php

namespace Database\Seeders;

use Illuminate\Database\Console\Seeds\WithoutModelEvents;
use Illuminate\Database\Seeder;
use Illuminate\Support\Facades\DB;

class PositionSeeder extends Seeder
{
    /**
     * Run the database seeds.
     */
    public function run(): void
    {
        DB::table('positions')->insert([
            [
                'code' => 'FE',
                'name' => 'Front End Developer',
                'description' => 'Front End Developer'
            ],
            [
                'code' => 'BE',
                'name' => 'Back End Developer',
                'description' => 'Back End Developer'
            ],
            [
                'code' => 'SA',
                'name' => 'System Analist',
                'description' => 'System Analist'
            ],
        ]);
    }
}
Generate file seeder untuk tabel employees via Artisan
php artisan make:seeder EmployeeSeederBuat kode program pada file seeder yang telah dibuat untuk tabel employees seperti di bawah ini.
<?php

namespace Database\Seeders;

use Illuminate\Database\Console\Seeds\WithoutModelEvents;
use Illuminate\Database\Seeder;
use Illuminate\Support\Facades\DB;

class EmployeeSeeder extends Seeder
{
    /**
     * Run the database seeds.
     */
    public function run(): void
    {
        DB::table('employees')->insert([
            [
                'firstname' => 'Purnama',
                'lastname' => 'Anaking',
                'email'=> 'purnama.anaking@gmail.com',
                'age' => 20,
                'position_id' => 1
            ],
            [
                'firstname' => 'Adzanil',
                'lastname' => 'Rachmadhi',
                'email'=> 'adzanil.rachmadhi@gmail.com',
                'age' => 25,
                'position_id' => 2
            ],
            [
                'firstname' => 'Berlian',
                'lastname' => 'Rahmy',
                'email'=> 'berlian.rahmy@gmail.com',
                'age' => 23,
                'position_id' => 3
            ],
        ]);
    }
}
Definiskan file seeder yang akan dieksekusi pada function run() di dalam file DatabaseSeeder.php
<?php

namespace Database\Seeders;

// use Illuminate\Database\Console\Seeds\WithoutModelEvents;
use Illuminate\Database\Seeder;

class DatabaseSeeder extends Seeder
{
    /**
     * Seed the application's database.
     */
    public function run(): void
    {
        $this->call([
            PositionSeeder::class,
            EmployeeSeeder::class
        ]);
    }
}
Eksekusi file seeder yang telah dibuat via Artisan
php artisan db:seed
6. Menampilkan List Data dari Database
Buat Raw SQL Query pada method index() di dalam file EmployeeController dan Passing data employee dari controller ke View.
public function index()
{
    $pageTitle = 'Employee List';

    // RAW SQL QUERY
    $employees = DB::select('
        select *, employees.id as employee_id, positions.name as position_name
        from employees
        left join positions on employees.position_id = positions.id
    ');

    return view('employee.index', [
        'pageTitle' => $pageTitle,
        'employees' => $employees
    ]);
}
Pastikan Facade DB telah terpanggil di bagian atas file Controller.
use Illuminate\Support\Facades\DB;Tampilkan data employee pada file View.
<table class="table table-bordered table-hover table-striped mb-0 bg-white">
  <thead>
    <tr>
      <th>First Name</th>
      <th>Last Name</th>
      <th>Email</th>
      <th>Age</th>
      <th>Position</th>
      <th></th>
    </tr>
  </thead>
  <tbody>
    @foreach ($employees as $employee)
    <tr>
      <td>{{ $employee->firstname }}</td>
      <td>{{ $employee->lastname }}</td>
      <td>{{ $employee->email }}</td>
      <td>{{ $employee->age }}</td>
      <td>{{ $employee->position_name }}</td>
      <td>
        <div class="d-flex">
          <a
            href="{{ route('employees.show', ['employee' => $employee->employee_id]) }}"
            class="btn btn-outline-dark btn-sm me-2"
            ><i class="bi-person-lines-fill"></i
          ></a>
          <a
            href="{{ route('employees.edit', ['employee' => $employee->employee_id]) }}"
            class="btn btn-outline-dark btn-sm me-2"
            ><i class="bi-pencil-square"></i
          ></a>

          <div>
            <form
              action="{{ route('employees.destroy', ['employee' => $employee->employee_id]) }}"
              method="POST"
            >
              @csrf @method('delete')
              <button type="submit" class="btn btn-outline-dark btn-sm me-2">
                <i class="bi-trash"></i>
              </button>
            </form>
          </div>
        </div>
      </td>
    </tr>
    @endforeach
  </tbody>
</table>
7. Input Data ke Database
Buat Raw SQL Query pada method create() di dalam file EmployeeController untuk pilihan “Position” pada Form Create Employee. Kemudian Passing data tersebut dari controller ke View.
public function create()
{
    $pageTitle = 'Create Employee';
    // RAW SQL Query
    $positions = DB::select('select * from positions');

    return view('employee.create', compact('pageTitle', 'positions'));
}
Baca data positions pada file View.
<div class="col-md-12 mb-3">
    <label for="position" class="form-label">Position</label>
    <select name="position" id="position" class="form-select">
        @foreach ($positions as $position)
            <option value="{{ $position->id }}" {{ old('position') == $position->id ? 'selected' : '' }}>{{ $position->code.' - '.$position->name }}</option>
        @endforeach
    </select>
    @error('position')
        <div class="text-danger"><small>{{ $message }}</small></div>
    @enderror
</div>
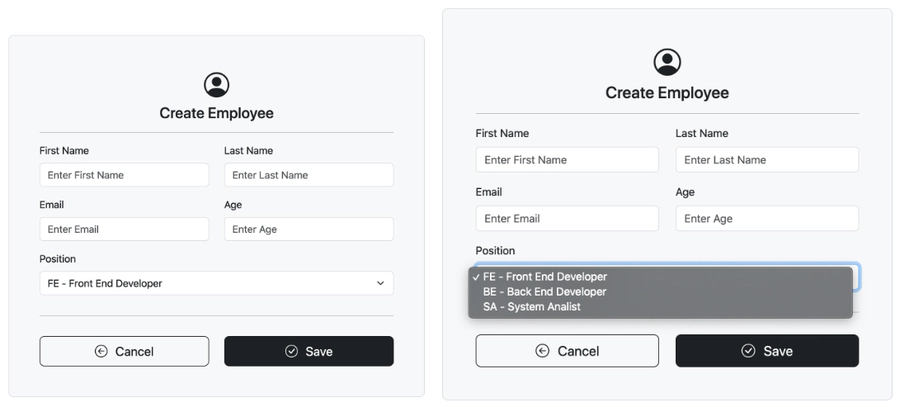
Hasil Akhir Form Create Employee adalah seperti di bawah ini.
Buat Query Insert pada method store() di dalam EmployeeController. Kemudian redirect Route ke halaman Employee List.
public function store(Request $request)
{
    $messages = [
        'required' => ':Attribute harus diisi.',
        'email' => 'Isi :attribute dengan format yang benar',
        'numeric' => 'Isi :attribute dengan angka'
    ];

    $validator = Validator::make($request->all(), [
        'firstName' => 'required',
        'lastName' => 'required',
        'email' => 'required|email',
        'age' => 'required|numeric',
    ], $messages);

    if ($validator->fails()) {
        return redirect()->back()->withErrors($validator)->withInput();
    }

    // INSERT QUERY
    DB::table('employees')->insert([
        'firstname' => $request->firstName,
        'lastname' => $request->lastName,
        'email' => $request->email,
        'age' => $request->age,
        'position_id' => $request->position,
    ]);

    return redirect()->route('employees.index');
}
8. Menampilkan Detail Data dari Database
Buat Raw SQL Query pada method show() di dalam file EmployeeController dan Passing data employee dari controller ke View.
public function show(string $id)
{
    $pageTitle = 'Employee Detail';

    // RAW SQL QUERY
    $employee = collect(DB::select('
        select *, employees.id as employee_id, positions.name as position_name
        from employees
        left join positions on employees.position_id = positions.id
        where employees.id = ?
    ', [$id]))->first();

    return view('employee.show', compact('pageTitle', 'employee'));
}
Buat file baru di /views/employee/show.blade.php. Tampilkan data employee pada file View tersebut.
<!doctype html>
<html lang="en">
  <head>
    <meta charset="UTF-8" />
    <meta http-equiv="X-UA-Compatible" content="IE=edge" />
    <meta name="viewport" content="width=device-width, initial-scale=1.0" />
    <title>{{ $pageTitle }}</title>
    @vite('resources/sass/app.scss')
  </head>
  <body>
    <nav class="navbar navbar-expand-md navbar-dark bg-primary">
      <div class="container">
        <a href="{{ route('home') }}" class="navbar-brand mb-0 h1"
          ><i class="bi-hexagon-fill me-2"></i> Data Master</a
        >

        <button
          type="button"
          class="navbar-toggler"
          data-bs-toggle="collapse"
          data-bs-target="#navbarSupportedContent"
        >
          <span class="navbar-toggler-icon"></span>
        </button>

        <div class="collapse navbar-collapse" id="navbarSupportedContent">
          <hr class="d-lg-none text-white-50" />

          <ul class="navbar-nav flex-row flex-wrap">
            <li class="nav-item col-2 col-md-auto">
              <a href="{{ route('home') }}" class="nav-link">Home</a>
            </li>
            <li class="nav-item col-2 col-md-auto">
              <a href="{{ route('employees.index') }}" class="nav-link active"
                >Employee List</a
              >
            </li>
          </ul>

          <hr class="d-lg-none text-white-50" />

          <a
            href="{{ route('profile') }}"
            class="btn btn-outline-light my-2 ms-md-auto"
            ><i class="bi-person-circle me-1"></i> My Profile</a
          >
        </div>
      </div>
    </nav>

    <div class="container-sm my-5">
      <div class="row justify-content-center">
        <div class="p-5 bg-light rounded-3 col-xl-4 border">
          <div class="mb-3 text-center">
            <i class="bi-person-circle fs-1"></i>
            <h4>Detail Employee</h4>
          </div>
          <hr />
          <div class="row">
            <div class="col-md-12 mb-3">
              <label for="firstName" class="form-label">First Name</label>
              <h5>{{ $employee->firstname }}</h5>
            </div>
            <div class="col-md-12 mb-3">
              <label for="lastName" class="form-label">Last Name</label>
              <h5>{{ $employee->lastname }}</h5>
            </div>
            <div class="col-md-12 mb-3">
              <label for="email" class="form-label">Email</label>
              <h5>{{ $employee->email }}</h5>
            </div>
            <div class="col-md-12 mb-3">
              <label for="age" class="form-label">Age</label>
              <h5>{{ $employee->age }}</h5>
            </div>
            <div class="col-md-12 mb-3">
              <label for="age" class="form-label">Position</label>
              <h5>{{ $employee->position_name }}</h5>
            </div>
          </div>
          <hr />
          <div class="row">
            <div class="col-md-12 d-grid">
              <a
                href="{{ route('employees.index') }}"
                class="btn btn-outline-dark btn-lg mt-3"
                ><i class="bi-arrow-left-circle me-2"></i> Back</a
              >
            </div>
          </div>
        </div>
      </div>
    </div>

    @vite('resources/js/app.js')
  </body>
</html>
9. Menghapus Data dari Database
Buat Builder Query pada method destroy() di dalam file EmployeeController kemudian redirect Route ke halaman Employee List.
public function destroy(string $id)
{
    // QUERY BUILDER
    DB::table('employees')
        ->where('id', $id)
        ->delete();

    return redirect()->route('employees.index');
}
10. Tugas
- Praktekkan seluruh langkah-langkah yang ada di atas secara INDIVIDU.
- Buat Fitur Edit untuk melengkapi hasil akhir dari tutorial ini.
- Ubah semua query yang ditulis dengan RAW SQL QUERY menjadi dengan pendekatan QUERY BUILDER.
Note

